Stencil Fun


Beginning a new stencil project for a Christmas gift if it turns out.

In the first picture I used:

Canvas Panel

Mars Black Paint

Stencil Brush

I swirled my brush with the paint so that I got a little bit of texture here and there.  I also noticed that when the light hits it you can see the swirl pattern.. Since my stencil is a circular design I thought I would try base coating in this manner.   

I am going to be using several different paints.  The shift paints in several different colors, silver paint, and  a medium green color.  I also have a Green Iridescent that I might incorporate.   The recipient is color blind but green is green for him...so I want to use several shades of green in the piece.  What he will see will be different from what I see......

Should be interesting.  I am not sure how it will end up.  Just know as the steps complete.  

The Stencil is by Stencil Girl and is a Mod Abstract Design.  

Stay tuned to see the progress.


Plastic Charger plate


 I found these plastic plates at Dollar Tree and then today I found additional different colors...but twice the price at Hobby Lobby.   I will wait till they come on sale ...  (but did pick up some pale, pretty pink ones they had on clearance for 79 cents so I picked up 6 to see what I might be able to do with this color.)   On this silver Charger plate I used a pinecone boughstencil I sell in my Etsy shop and some TCW Modeling paste.  I used a random mix of white and silver pastes which worked out to my satisfaction.  I then put a gloss finish spray on the piece and added glitter that sparkles different colors........that was just what was needed to send this over the edge.  I have done some with a snowman, Christmas Tree, snowflake, etc.  all stencils.  A glass plate on top and you have a beautiful serving tray, charger, or maybe even a wall hanging.   There is no way these look like plastic plates.   

Winter Intuitive Morphing Painting


Intuitive painting depends a lot on the artist.  I knew I wanted winter....but not necessarily CHRISTMAS or holiday....something that could remain up for awhile.  

I LOVE winter, snow, the moon, fog bare tree limbs , and glitter so with that in mind I gathered my supplies.
+++++++++++++++++++++++++++++++++++++++++++++++++++++++++++++++++++++++++++

I am working on a large wood snowflake that I purchased at the Dollar Store as well as the Canvas.   I will show the progression of this surface in another post.  I also purchased a large wood ornament shaped  piece that I am going to paint with stencils of Christmass Tree Ornaments and ?? 

&&&&&&&&&&&&&&&&&&&&&&&&&&&&&&&&&&&&&&&&&&&&&&&&&&&&&&

SUPPLIES

Long Skinny Canvas 
Paynes Grey Acrylic Paint (Matisse) and White
Black and White Modeling Paste,  TCW  (adds dimension) 
Shimmering White Modeling Paste, TCW
Snowflake and misc Stencils  
DecoArt Glitter SnowTex 
Stencil Brush, Basecoating Brush,  Mop Brush IPC Brushes

DYNASTY IPC BRUSHES:   www.thebrushguys.com 
DYNASTY STENCIL BRUSHES:  www. the brush guys. com
SPECTACULAR STENCIL ARTIST  BRUSH:   Chris Haughey  www. cdwood.com 
STENCILS:  www.artisticrenderings.etsy.com 

There is a big difference in the color Paynes Grey from brand to brand acrylic paints.  For this particular piece I am using Matisse as it is the only Paynes Grey I had in my paint stash.  It is not grey or blue just  a good, dark, cool background color.

I base coated with PG and white using a large flat brush and a slip slap motion  X ;  keeping it lighter at the top and darker at the bottom....  Periodically I added white with the PG  and used my brush in a light circular motion to create some atmosphere....fog, mist, etc.  It is important to blend well so that are no "stark" lines of non blending visible....  This takes some practice.   I use the Dynasty IPC brushes for this technique.  Working with both the PG and W colors.

Next I began using my stencils to create the different shapes/sizes of snowflakes.  I keep most of the larger ones towards the bottom of the painting... smaller to the top which helps to give the feeling of distance/depth  to the painting.    Sometimes I used just white, sometimes I added a little PG and sometimes just the PG.  Follow your instinct.

Notice that in the 2nd photo some stencils have disappeared.  This is done using  PG and W to push the stencil backwards.   I use my IPC brushes to achieve this and a circular movement with the brush.


DONE....

Tonight I used the silver foil on the edges....added silver glitter and some iridescent flakes.  Used a stencil for the "BLESSINGS" and I am pretty sure it is done so I sprayed it with a satin finish spray and it is hanging down in my art room ....  The all white branch bothers me a bit so I may do a little lifework on it but we'll see.   I hate to do it and then regret it....Sometimes we just have to accept Done....as DONE...

NEXT:  is An autumn Leaf one and Christmas ornaments....


FINE LINE RUBBER STAMPS


I sell Rubber stamps in my Etsy Store.

The above two stamps have been named Spiral Swirls from the manufacturer.

Same design....different layering of design.  

The stamp on the left is a Fineline stamp and it produces a design ON TOP  of the clay.  

Photo on the right  is the same design, different depth in layering and produces an image INTO the clay.  The depths of layering may also vary within the stamp....this is not a defect....it is done on purpose to create the intricacy and delicate patterns that the artists who use them love.  

There is a big difference in the craft stamps and artist stamps...and takes a little practice and getting used to.  

  Taking a photo of the fineline stamps is hard as you can see when a photo is taken of  the fineline and regular cut side by side.  I find that in order for a potential buyer to see the design to have an idea of how it will "print" for them I am have to rely on taking a close up.  I have had a couple of inexperienced players accuse me of being deceitful with my pictures.....  That was most certainly NOT my intent.  Below is a photo of the same fineline stamp as above taken at a closer range.  


There is no place in Etsy where I can provide this type of information to a potential buyer so I am hoping that there is a way I can direct potential buyers here who have questions....  

The work that artists are doing with these fine line stamps is amazing and beautiful.  It isn't that the fineline stamps don't work...it is because the buyer doesn't purchase knowing what they will and will not do.  


THE GIRLS


A few years ago I began collecting these adorable pieces.  They are all named on the bottom.

My first one was Diana.... and since that one I have been able to add some more.  I always keep my eye open when I am thrifting...where all of these were purchased.  I just added my fourth one this week...and I paid $4.99 for it.  When I go thrifting I set a $ max on the days visit and on what I purchase...   

One reminds me of a dear friend I lost about 6 years ago.  I don't keep track because I don't want to know. One of the other ones reminds me of another friend....and so on.  They sit inside a built in windowed cabinet in my kitchen and I look at them and check in often.  

I love that each one of them is TOTALLY different from the other in just about every way possible...


OCEAN MOTION.....Susan Farrell Technique


I am nearly finished with this one.  I have added 2 more layers of paint since this photo and I am now getting ready to do my last step or two.  In this photo I was on my 3rd layer.

OCEAN MOTION 

I kinda hate finishing a piece because that means "this journey is over". 

I have signed up for Susans Stained Glass online class and I am getting ready to begin step 1.  Just have to look through my stencils and pick which ones I want to use for the different 
stencil layers I know we will be doing.

In my mind; for one. I want to do an Egyptian/Spiritual theme so I have to be thinking towards that one also for stencils and colors.  

I am not sure if the edges on this one will be silver or copper foil...but by the time I get 
to this stage I probably will totally go in another unexpected direction.

ART HEALS.....helps us to get "out of our head" and into a more intuitive state..where things are actually clearer...and you "feel" what is right, what is true, and there is just one solution.....
which I am hoping everyone will eventually see. 

I will add a finished photo later so check back.

Done.  All that is left for me  to do is take care of the edges and I think I am going to 
call this one Done.  
I posted this on Facebook and one of my friends said "BUSY but not too Busy".  So I have had busy on my mind.  She is right...it is bordering on busy.... 
I have realized a couple of things regarding this painting:
1.  I need to have a variety of different size stencils.... I have too many small ones which is giving it a  too busy look.
2.  I need to have more purple stencils on the bottom 
3.  No Modeling paste for stencils unless I am REALLY sure that is what I want.  I have a big blurb on this one I don't like.
4.  With the 1st application of the white stencils I need more and once again some stencils are too small so I need to concentrate of bigger stencils.

SO>>>>>>hopefully this might help someone else along life' artistic journey of what ifs........

Toolbox transformation


I have had this ugly tool box forever....I loved that it was long and slender....that is why I kept it for so long...I wanted it to be special.....   This is the before, (of course) and it is working up beautifully using a stencil I purchased from Russia, modeling paste in Gold, silver and copper along with other stencils that I sell in my Etsy shop.  I have even incorporated some gold and copper colored crystals into the design and some black glitter which I purchased on a whim and love.


Red Floral (Poppy or Hollyhock petals) Challenge.


The red flower glass piece was posted on Facebook.  I have no idea who the artist was it just stated it was glass art.  I work on glass but I wanted to see what would happen if I used the glass paints on canvas and if I painted a backdrop first.   I have chosen the colors I want to use and have painted the canvas with Blue, yellow and green acrylic paints.  I am using a large gallery wrapped canvas and when it is finished I would like it to hang behind the couch in my living room.  I need some bright color on that wall.   Now I have to determine what will come next.  Do I outline the petals with the black and fill in the red and green, OR do I paint petals and then outline.  Or do I do a little of each?
I think my next step just might be to get some random circles drawn on with a charcoal.  I am not confident enough to just "wing it"...  What I see in the inspiration piece that is above the framework I also have to think about.....which I think will end up being some thin wire and doing the circular and outline work on a piece of glass and peel off.....  Challenges are fun and one learns a lot... I hope.
I will take photos as I progress ......


Mixed Media Wall Hanging "Watchful Eye"


Mixed Media.       "Watchful Eye"

I saw a video of a woman who was doing a similar piece and loved it.  I had been wanting to do
a dragons eye for quite awhile...and her video was an inspiration.

Canvas Board.
Polymer Clay
Vintage Watch Face
Shift Paints
Jewelry Star
Swarovski Crystal Glue on crystals
Dragon Hide design mini wood rolling pin

I am going to add a bail and make a beaded chain for a wall hanging.


COMING SOON: N EW PRODUCTS for STENCILING and COLLAGE in my ETSY store.


                 I HAVE SOME NEW PRODUCTS COMING TO MY ETSY SHOP


One will be a stencil tool kit which will include 3 different sizes of the Dynasty Pro stencil brushes which are AWESOME.   (Which by the way is the BEST cleaning solution for cleaning the stencils and can be purchased at Dollar Tree) and the softest surgical brush you will ever see for cleaning your stencils with little or no effort providing you clean them IMMEDIATELY after use.

I have also ordered a Mini electric iron which is PERFECT for adhering on the mylar foils the I sell in my Etsy shop.  The irons are SO hard to find and work great for exactness of foiling vs a heat gun.  New foil packages are being this weekend in my Etsy Shop.

Last, but not least.  Some new color sprays.  Most were "sold out" but I was still able to get some awesome colors and will add more colors as they become available.   I have not  used them yet
but if they are mostly sold out they must be pretty spectacular.  Can hardly wait for them to arrive.

Check my shop the next couple of weeks for these new products.

Stencil Tool Kit
Mini Iron
Spray Mister Paints


ALSO COMING:

 Mini craft iron for mylar foils which are available in my shop.  Iron is also great for material used in small items.  1.4 inch.  I LOVE mine and they are nearly impossible to find.

New Spray paints.

Glass beads for collage work.  (I have been looking for these glass beads for years and have finally located a source.

Intuitive Abstract Painting Susan Farrell Technique

STEP #1
Acrylic Paints:        Red, Orange and Yellow  /  Warm colors
There are 7 layers to get to the FINAL.....This is my first step.  Just random dabs of 3 colors.
When I am finished I will post the final painting.  This is a technique by Susan Farrell and I am taking her Serendipity online class.   I have watched all of the videos and then went back to Step #1  and am working  my way through to??????????   Either a beauty or a fail.  Each persons' painting will be different based on colors, stencils used and placement.  The idea is to NOT copy but to produce your own intuitive pieces.   A far cry from patterned traced patterns with instructions as to what colors to use, brushes etc.  These new designs are totally one of a kind intuitively painted by intuitive painters. Wish me luck.

I am working on the last couple of steps.  Would you ever have any idea that were I am ending up began where I started?  I sure wouldn't......  I know where my mistakes are .... how they happened and what to do and not do on the next piece.  A  lot of fun....but each step has to dry so a minimum of a week from start to finish IF.... you work on it every day....

Have about 3 different ideas for the next pieces.... One spiritual, one oceanic, and one industrial.


For some reason I had to do this stencil Black.  It is called "Drip Face".  I did it first white and didn't like it and felt compelled to do this black.  The piece is not done...there are several areas that need
"more".  To me the black seemed to push the white stencils closest to it back giving more depth to the painting.   I am curious as to how this piece will finish up....I have NO idea....   I have been slow with these last steps mainly because I don't know where I am going..... I am not lost just the need to stop and rest a bit.  Since this is my first piece I will be trying a few different things....  Many of the stencils are done with modeling paste (for texture).  A couple of them will require a tiny bit of sanding.  I have used a Gold paste also and want to do a couple more stencils in the gold and a couple more black....


I thought I was done but there are a couple of areas at the bottom I want to push back a bit using a color and also to foil a bit more but basicall it is done.

I can hardly wait to do another...this one will be themed ocea/sea so tonight I got stencils pulled so that tomorrow night I will be ready to go.  Since this was not a gallery wrap canvas I edged the picture area with copper foil as well as the sides so that it can be hung with no frame.  I am pleased with the effect and the painting.   I learned a lot...

Charlie Brown

4-20-2020

Hi,
My name is Charlie Brown and I have lived with my new Mom and Dad for a little over a month and have been in what they keep saying is Quarantine  They don't have any idea what a real quarantine is.

Mom says I am stubborn, have a mind of my own,a tendency to do exactly what I am told NOT to do,
and  lifting your leg wherever you find a corner is NOT appropriate.  I have never really had anyone I
had to "mind:.  Things are definitely different here....

Mom gives me baths and tries to make me look better but I really think that I need a groomer.  I have no idea when I was pampered last....  I hold REAL still for Mom when she cuts because I KNOW she doesn't have any idea what she is doing....I am not going to move a muscle while she has this sharp  things in hand and another that buzzes.  .I still remember when she snipped my ear the first time.

I sure am glad that I live here....but I am just a dog from an abused home and I don't know a lot..
so I get slaps to the butt, a talking to, but I know tomorrow I will forget and do it again.  It is just a
habit; what I have always done.

It sure is a big world out there.  Mom sometimes takes me with her when she goes to town,, and
Dad takes me for rides in his Jeep.  I don't know where to look first there is so much to see up
here vs down there when all I really see is feet and legs...never who they belong to.


New Painting


This is a new piece I have just started.

Photo #1.  Slip slap background with paints on a canvas board.  (I used all of the Color Shift Paints with the exclusion of black)

Next I glued onto the painted canvas one of the specialty papers I sell in my Etsy store.  This one is so sheer and one of my favorites.
 
**As you tilt this canvas the colors change slightly from purple to blue, green to gold, etc.  I love
      the effect.  I also like the strings that are randomly apparent in the paper.**
My small travel hair dryer was "just the ticket" for drying and shrinking the paper slightly to remove
the trapped air bubbles that didn't disperse with my roller.

Next  (I think)  is Stencil #1.   I have chosen 3 different floral stencils but know that can quickly
change.  My thoughts are back to "color"....

UNICORN FINISHED


ABOVE IS MY FINISHED PIECE OF ARTWORK. 
BELOW IS HOW IT STARTED.
I have matted and framed using my "stash".  I cannot believe I had the
perfect size and match.  That doesn't happen very often.  
I have hung it where I can see it several times a day to determine whether it is REALLY DONE and soon it will be FOR SALE.


Since we have to be social distancing I thought I would distance myself with some art. The 1st photo shows a pour I did a few months ago.  Nothing special but a nice piece to play with and see what might or might not happen..and  a learning experience.  

The unicorn is a stencil and I used gold, silver, copper and white modeling paste.  I  let it dry overnight and in the morning I applied a coat of Satin varnish in preparation for the next time I would work on it.  The varnish protects this stage and in the event I don't like what I do next I can easily wipe it off.  

The stencil I have laid out to work with next is bubbles.  Small, overlapping, different sized open bubbles.  I also  want to shade around the unicorn with black to help bring 
him forward more.    


I have shaded around the unicorn and added bubbles in grey and white ransoming with the stencil.
Added another coat of Satin varnish and hopefully will find time to work on this again tomorrow
evening.  Taking photos of your art as I progress helps me to see differently things I might want to change, lighten or darken, etc.  More  bubble work will continue in my next sitting with this piece.  

Copper Earrings


Since it looks as if we are all going to be restricted from venturing around as we are used to I have
been using the time to create.   Just got 9 pair of earrings listed on my Etsy site for sale and I have
several different designs that I am going to make into necklaces over the weekend.   It feels good to create and pull things from the inside out.    I love the copper the way it shines and reflects light.  Seems so richly elegant but simple and unique.


Believe in Unicorns Stencil

I am working on a canvas piece using this stencil which is new in my Etsy shop.
The base coat for the canvas was Paynes grey and a complementary purple along with Warm White
 with acrylic paints in a soft foggy slip slap.  I have used a modeling paste (Pearl White and White) for the unicorn... and using other stencils I will be adding accents....  I will take a photo tonight after I spend an hour or so with it ....  The mat is going to be purple and the frame white.  I am never quite sure what I am going to do until I do it...

It is relaxing and a lot of fun to just play a little.


This is a couple of nights work.  Goofed up doing the I believe in Unicorns.....so tomorrow night I have to fix this...put my hand right in it....  I have spattered the paining and the mat with Glamour Dust Paints the lightest one they carry .   Not too much....not too little.  I ended up using 6 stencils....IF this is finished.  I will look for a piece of glass and get it framed....erase my charcoal lines, etc.  Hopefully someone will like it and purchase....

Stencil on Tin

 This shows the finished product down to the bare beginning.  I am not sure if this is done so it is hanging where I can see it throughout my day.  The very bottom photo shows how it began....a garage sale find from last summer.  I then used a Purple shade and Birch White to get this mottled background effect.  The stencils are all available in my Etsy Store.  I had some copper tape I bought ions ago from a Canadian store and used it around as a border edging.  I want to add some more glitter.....have black that might look nice.  We'll see.  So check back for any final changes I might make.  The medallion and the dragonfly  was done using silver, copper and gold metallic paste.  Also used was the black paste.


NEW STENCIL DESIGN TRIBAL MEN


I just received the stencil Tribal Men (in my Etsy shoppe for sale)
 and had to take time to give it a whirl ... as I just loved it and a lot of ideas were spinning around in my head.

I grabbed (photo #2) a stretched canvas that I had poured on that wasn't very pretty and decided to see what the stencil might look on it.

Looking around I decided to use Copper and Black Modeling Paste and some other stencils I had on hand and photo #3 is where I left off; but I am not done....much more to happen so check back...
(Modeling pastes should be here soon and for sale in my shop).


Last night I was able to go down and work a little more on this ...  I guess maybe mixed media canvas.  Photo follows...but it is still not done.  Maribou feather...love the whispy texture.  Twigs, Goldstone gemstone, steampunk button, a wooden bamboo bead,  and manzanita sticks.  I have no idea what will be next.


I WANNA PAINT


I am being forced to make a lot of changes in my Etsy shop.  AND...as I work along I can see it
is LONG overdue.  So many "wrongs" and no explanations so it looks as if I will be busy for
quite awhile....but worth it in the end.

Then there's Income Tax preparation.  Transactions to run.  Adding to do. along with normal
everyday life.

AND I WANNA PAINT.

So, as I sit here doing what must be done before what I want to do I am taking notes.

I want to use a COLOR PALETTE of:
Paynes Grey
Purple
Green
Pink or a Coral/Salmon
White to Lighten Colors of Palette
Bronze or Gold Line-work

I want the Subject matter to be:
A Landscape

I want to Use a canvas I was playing with that has some polymer clay and rubber stamping up one side and I am thinking a stencil.  Butterfly, dragonfly, floral .....  and will use acrylic paints.

Wonder what else will come through as I sit here working?


CJORIGINALS.ETSY.COM Gemstone & Gemstone Jewelry


My sister (Cindy) is selling and adding gemstones, and gemstone jewelry to her Etsy site on a
weekly basis.  She has some gorgeous, unique, gemstones that are said to be spiritual and healing
depending upon the stone, and sometimes the color.  This is a place pink, clear and white Dragon
Vein gemstone.  She has a good selection...  I have heard that the right person will be drawn to the right stone that is needed in their life.

www.cjoriginals.etsy.com


Beginning Intuitive Art


I guess this is going to be a mixed media dimensional project.  I am just beginning and believe me when I say I have NO idea where I am going.  I am just "doing".

This evening I worked some more on it so will add another picture soon.   I find myself "wandering".  Picking up things that "might be what I need".  It is one of those cases where you just kinda "wander" mentally and physically and pretty soon you have a pile of "stuff".  I may not use it....but then again I may.  I am not going to "force" the piece I am going to let it lead me wherever it is I am to go...

The face is a mold I made out of a 2 part molding compound.   I probably should have sanded it a
bit more after I took the clay out of the mold and after baking....but I didn't ;  so evidently it was not
a necessary step for what I am doing...so I am not going to "sweat it" just yet.

The paint is a "new" paint for me .... coming from a  decorative paining painting background I have a lot to learn...about different paints, new paints, and this one looks blue and green depending how the light hits it........but what I do like are the technique and product knowledge I gained along the way that is hopefully going to come in handy on this piece.    I have also used Ivory Black (thank you Linda Benton Mccloskey).  I have learned about the uniqueness of this color from one of your tutorials with something you said about the different colors that can come out of this particular color....... and then Lamp Black to do some shading where I felt it was needed after base coating.

I learned a lot too from taking an online class with Whitney Freya.  Then another couple of classes with Ree Altavilla and Flora Aube.  Sometimes I get an idea, learn a technique (I LOVE techniques), a new way to do something, a paint application......I never know what I will learn, but I KNOW I will learn "somethings".

So stay tuned for Session II. with a photo or two....


SESSION #2        GATHERED ITEMS
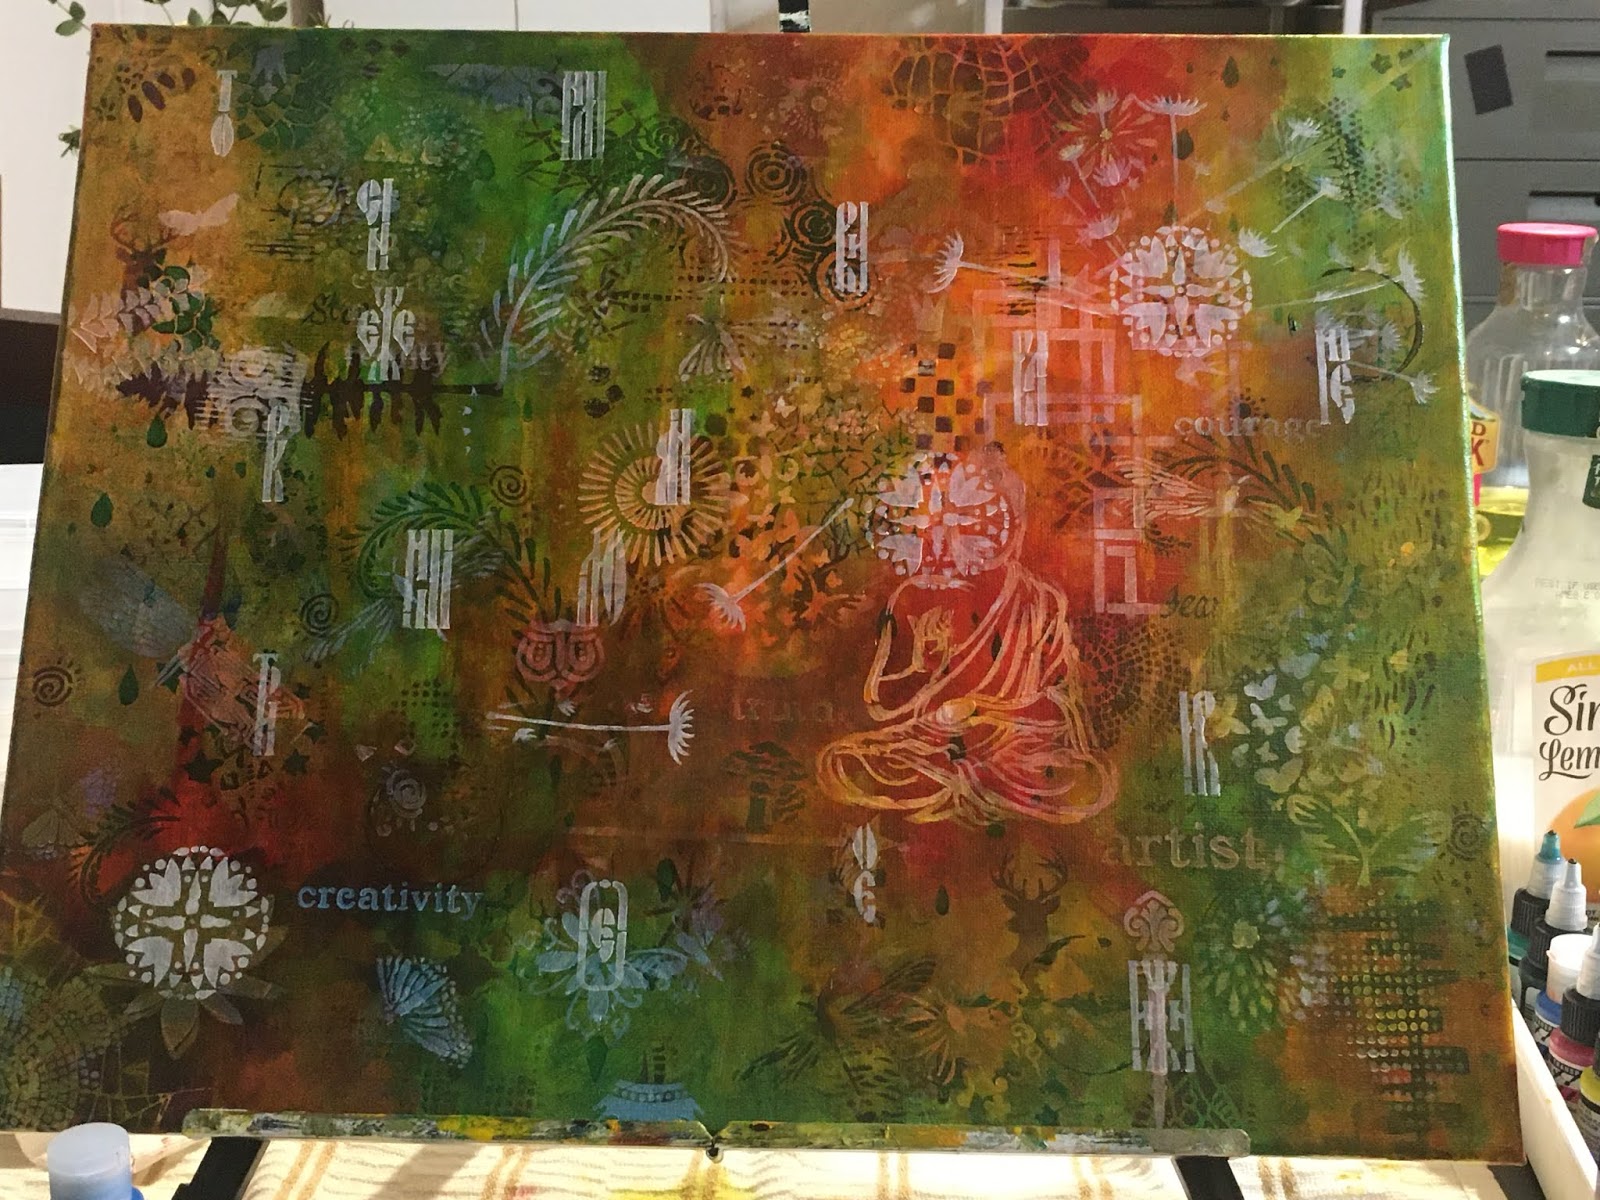
In the bottom photo I have added some silver beads here and there in the headless portion.  And am pretty sure I am going to used the Color I have laid here.  I do not like the eye area...so want to keep this area in mind...  I have some material, parchment scrapbooking paper, a canvas, wood beads, a strip of rhinestones, and some silver scrapbooking paper.  Tonight.....I will be adding some color.


SESSION #3.

Painted the canvas board a complimentary blue mixed with Golden Iridescent medium 
and glued the parchment map
(Scrapbooking paper) on top.  
I am liking the atmospheric look behind the map.  
Not sure what will be next, but I am letting this dry overnight.  I am thinking that I want to preserve what is done so far so I am thinking that I will seal.  I know that I want to add a dimensional layer but I am not sure how this will happen.


Session #4.

Tonight was an OMG what is going on?  This is horrible.  And I remember and know
that during an artistic journey there can sometimes be stages of UGLY....but this is ridiculous.  
Normally, I would just get huffy and throw it away......but with this I am going 
to go on.......realize it is what it is and that it is not the "end" but a new beginning when I step back 
into my studio tomorrow.  Maybe some angel happenings will occur tonight 
while I am sleeping.  Yea, right.


All I know is that I DID NOT expect THIS.

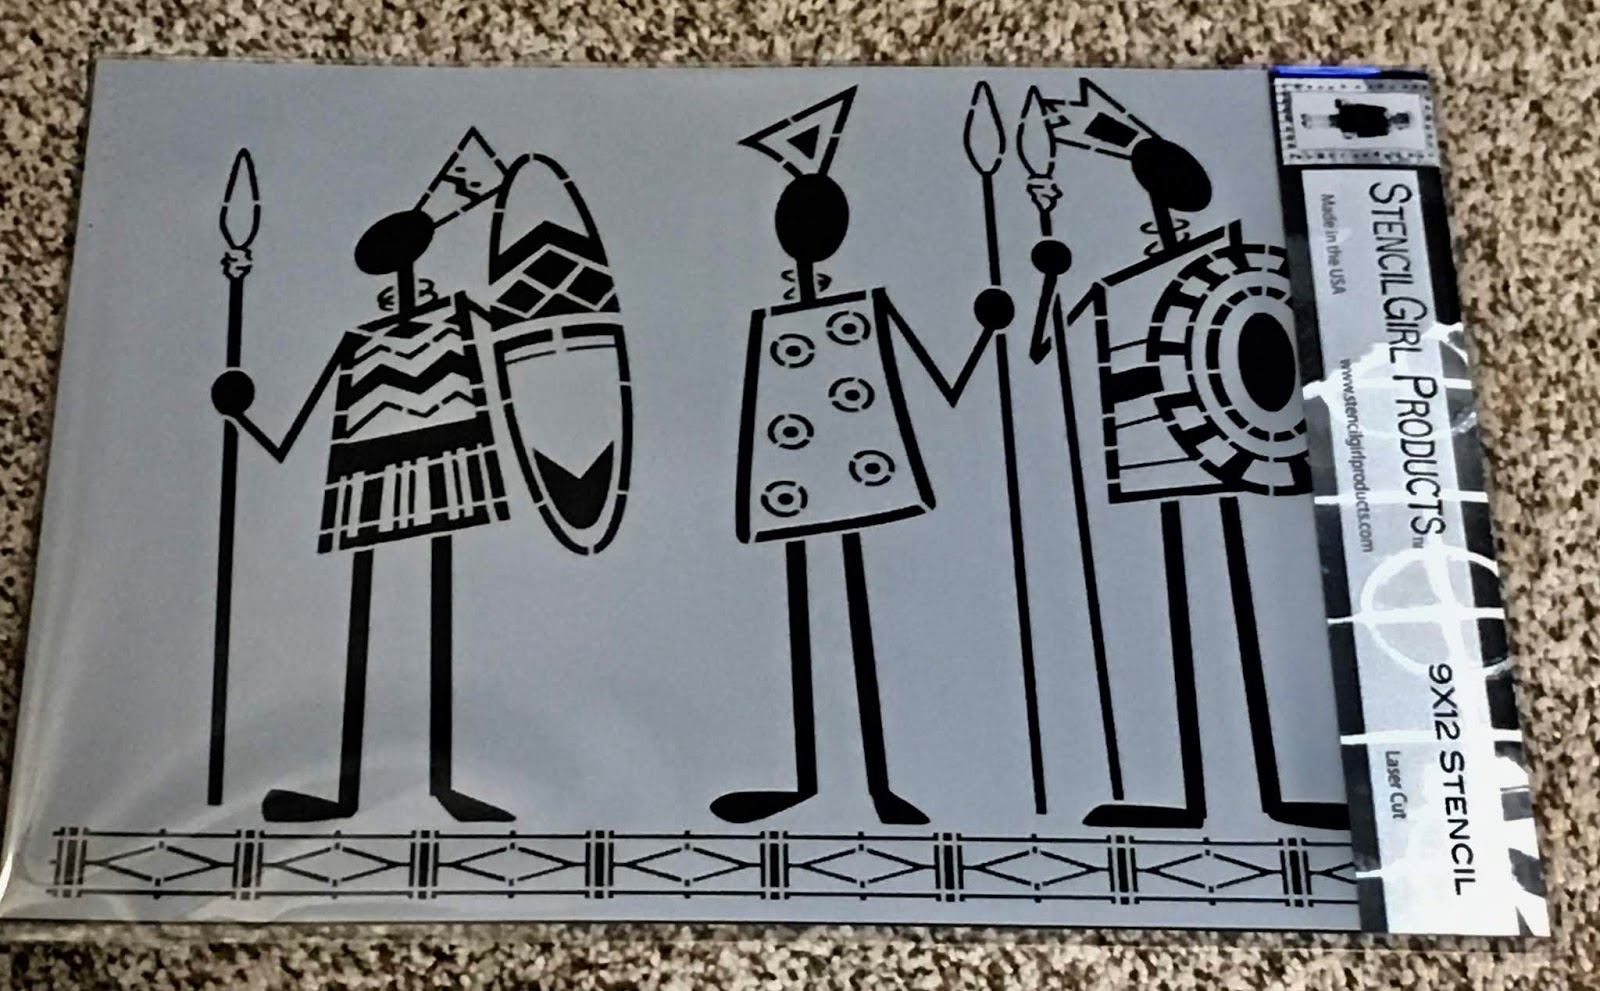
Used a StencilGirl stencil.....Silver and black molding paste.  I just keep moving the face around...   and I am wondering if it will even "belong" to this piece of art.   Need Fresh eyes.  


SESSION #5.

I sanded down some of the Modeling Paste since it set up and am a bit happier...there is texture but no edges.  Connected Trees....and now I am adding the foils.  Not done with all of the trees yet but done for tonight.

A few months ago I took an online class called Soul Blossoming and never had any intuitive success with my first piece so now I am wondering if this is where this piece is going.  Gives me a funny feeling of wonderment questions.


NEARLY DONE.

This is the latest progression.  It is nearly done.  Only one more thing to add and then the frame which I have had and I think it is perfect for this piece.


I wasn't happy with the circular portion of the piece.  Now I am.  
Fried CD's.....  and I wanted them placed a bit abstractly.  Spent a lot of time on this step trying different things, different arrangements .  Tomorrow I will have photos of the finished piece.


DONE:

I LOVE FREEZIN' FOG DAYS

I LOVE FREEZIN' FOG DAYS
Freezing fog on a pine tree bough.